How to Transcribe Audio Files: A Beginner's Guide
June 8, 2025


For you, we'll explain how to easily transcribe recorded audio file data.
Transcribing recorded audio data from meetings or interviews manually can be extremely time-consuming.
Previously, the only option was to play the audio file and type it out on a keyboard, but that's no longer the case.
It's now possible to easily transcribe using convenient tools, including AI transcription services like 'Mojiokoshi-san'!
This article will cover:
- AI transcription services
- Using standard Windows or Mac features
- Using Google Docs
We'll thoroughly explain these methods for transcribing audio file data, so please use this as a reference for your transcription needs.
Transcribing Recorded Audio Files
First, let's briefly explain the available methods for transcribing audio data into a text file.
Audio File Transcription Methods

There are several ways to transcribe recorded audio files into text data.
- Using AI transcription services
- Transcribing with standard Windows or Mac features
- Using Google Docs' voice recognition feature
Previously, the only way to transcribe audio data was to listen to the file on an audio player and type it out on a keyboard.
Typing it out yourself required a lot of time and effort, and outsourcing to a professional transcriptionist was expensive.
However, with the advancement of AI speech recognition technology, you can now convert audio data into text files quickly and accurately using AI transcription services.
What's more, AI transcription services can even be used for free.
If you need to transcribe recorded audio files from meetings or interviews, it's highly recommended to try an AI transcription service first.
AI Transcription Services are Smoother for Transcribing Recorded Audio Data

Text-to-speech features are built into PCs like Windows and Mac, as well as iPhones and Android smartphones.
However, in all these cases, the standard built-in features only transcribe real-time audio.
If you need to transcribe pre-recorded audio data from meetings or interviews, an AI transcription service that's easy to use via your browser is recommended.
AI Transcription Services Offer Higher Accuracy Than Standard Features
AI transcription services transcribe recorded audio files by uploading them.
Real-time transcription can sometimes lead to inaccuracies or skipped content due to processing limitations.
When you transcribe pre-recorded audio files with an AI transcription service, you don't have to worry about such issues.
For highly accurate transcription, an AI transcription service is recommended!
For Audio Data Transcription, Use 'Mojiokoshi-san'

If you're looking for a way to transcribe audio file data, there's a recommended service for you.
That's where the AI transcription service, "Mojiokoshi-san," comes in.
"Mojiokoshi-san" is an AI transcription service developed in Japan that utilizes the latest AI technology.
It supports transcription of audio files from meetings and interviews, as well as video, image, and PDF transcription.
Fast, Accurate, and Convenient Transcription with the Latest AI
A key advantage when transcribing audio file data is that you can conveniently transcribe with the latest AI.
With the latest voice recognition AI, "PerfectVoice," even long audio data can be transcribed in just 10 minutes!
You can also conveniently transcribe meetings using the timecode function.
Furthermore, it supports over 100 languages, making it possible to transcribe foreign language audio files.
What's more, "Mojiokoshi-san" allows you to transcribe up to 3 minutes of data for free, without needing to register or log in.
If you're unsure how to convert your data, why not try "Mojiokoshi-san" for free first?
How to Transcribe Audio Files with an AI Transcription Service
Now, let's specifically explain how to transcribe recorded audio file data.
First, here's the process for transcribing audio files into text data using the AI transcription service "Mojiokoshi-san."
1. Open the "Mojiokoshi-san" Top Page

"Mojiokoshi-san" is particularly easy to use among AI transcription services.
The operation is simple: just upload your recorded audio data file from the top page.
First, open the "Mojiokoshi-san" top page from this link.
2. Upload Audio File
Drag and drop the file, or click "Select" → choose the file and upload it.
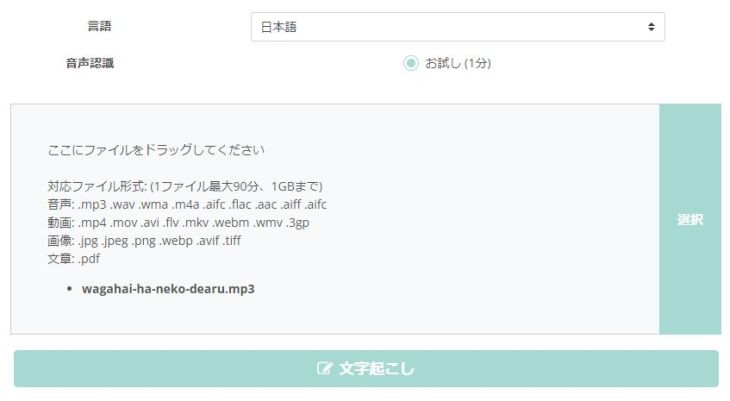
The audio file data formats supported by "Mojiokoshi-san" are as follows:
- .mp3
- .wav
- .wma
- .m4a
- .aifc
- .flac
- .aac
- .aiff
- .aifc
*Maximum 90 minutes and 1GB per file
3. Start Processing
Once you upload the file, processing will start automatically.
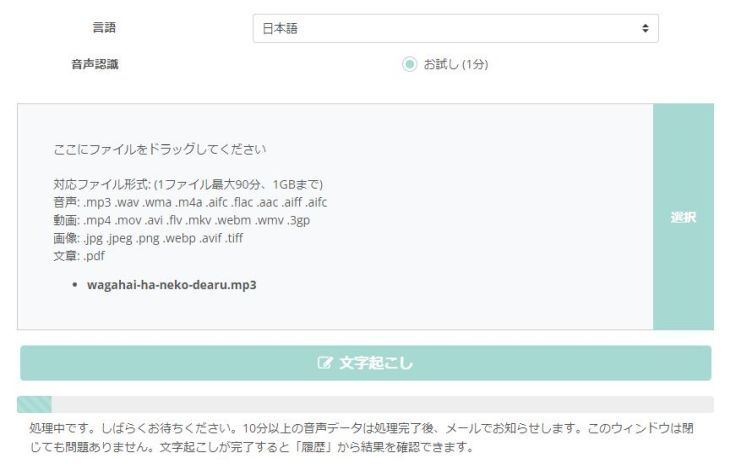
You will be notified by email when the transcription is complete, so it's fine to close the page after uploading.
*If you are transcribing for free without registering or logging in, please wait on the top page for the transcription results to appear.
4. Transcription Complete
Once transcription is complete, you can check the results from the "History" page.

Also, if you kept the top page open, the transcription results will be displayed directly on the top page.
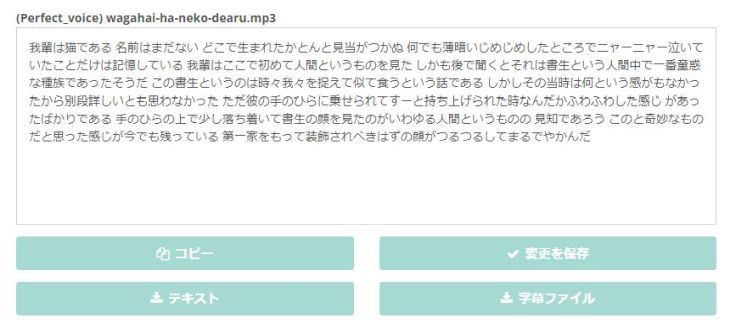
You can directly select and copy the text from the transcription results or download the data using the "Download" button.

This completes the process of transcribing audio data using 'Mojiokoshi-san'.
Since it's as easy as uploading a file, why not try transcribing your audio data with 'Mojiokoshi-san' too?
How to Transcribe Audio Data Using Standard Features on Windows and Mac
On computers like Windows and Mac, you can transcribe audio data into text files using built-in features.
Compared to AI transcription services like 'Mojiokoshi-san',
- Setup can be cumbersome
- Transcription accuracy may be lower
These are some disadvantages, but they also have the advantage of being usable in environments without an internet connection.
Here, we will briefly explain how to transcribe audio data using the standard features of Windows and Mac.
Transcription using Standard Windows PC Features
※This explanation uses Windows 10.
To transcribe audio data files using the standard features of a Windows PC, you first need to prepare to use the speech recognition function.
1. Preparing to use Speech Recognition
To use the speech recognition feature, first open the Start menu and select "Windows Ease of Access".
Next, click "Windows Speech Recognition" to open it.
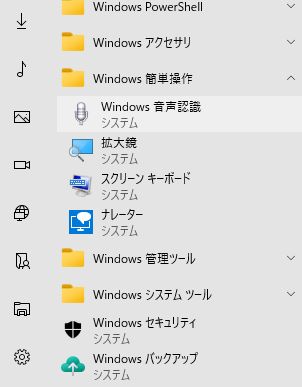
The first time you use the speech recognition feature, you will need to complete a setup process.
When "Windows Speech Recognition" is launched for the first time, the setup screen will open automatically.
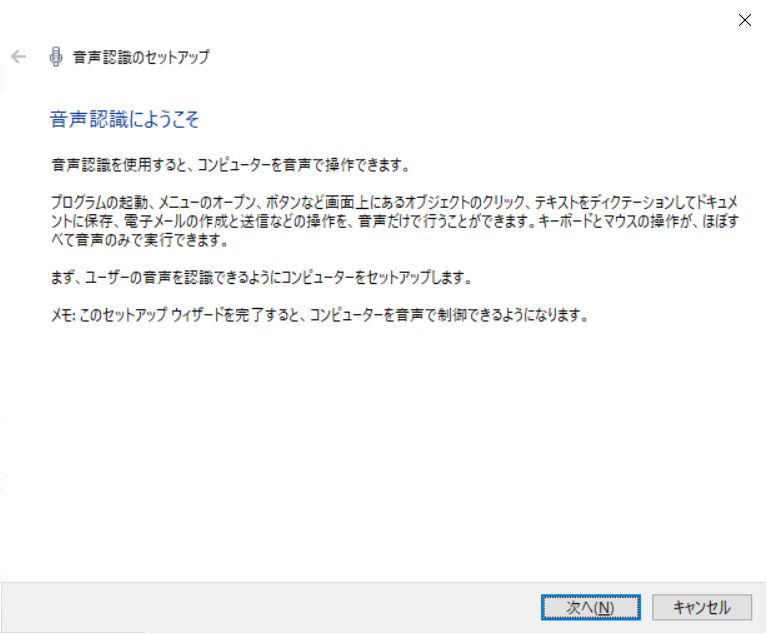
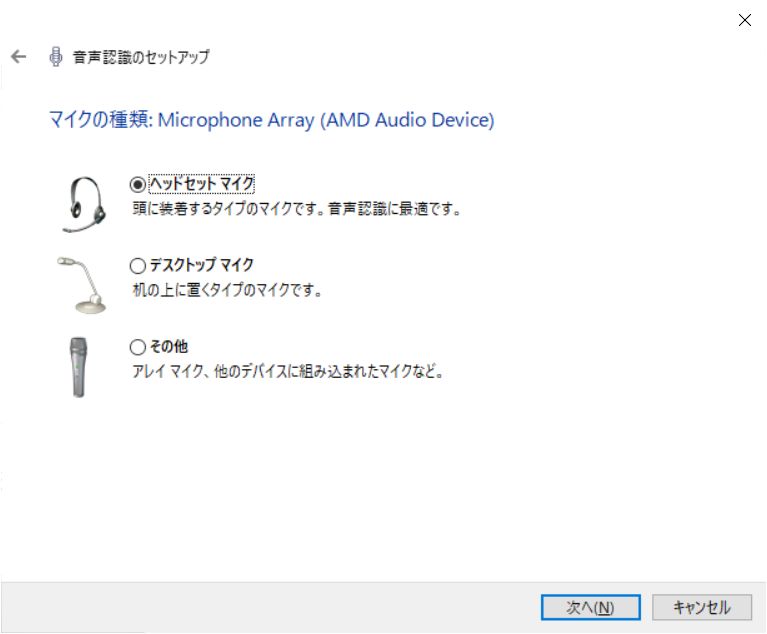
During setup, you first select the microphone to use.
Next, read the displayed text aloud to allow your computer to recognize your voice as data.
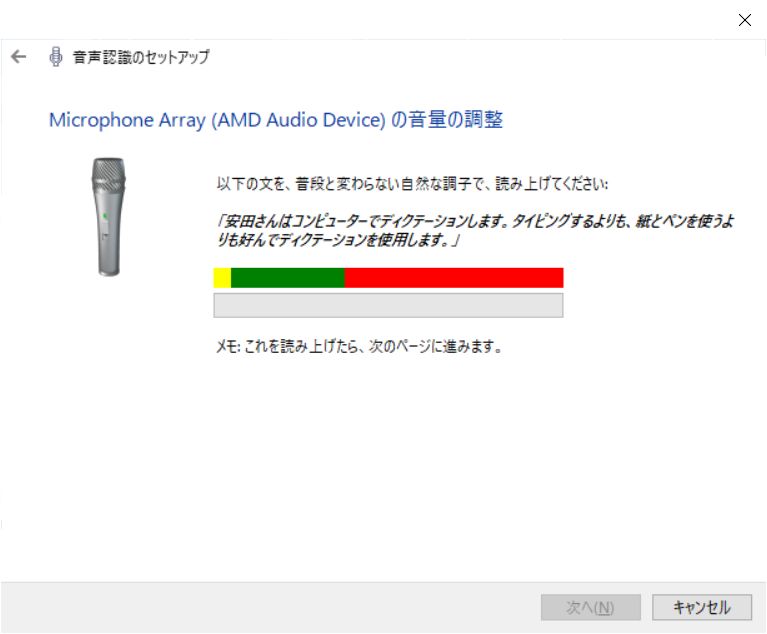
By allowing the computer to learn your accent, intonation, and voice quality, you can achieve higher quality transcriptions.
※For this reason, it struggles to recognize multiple people's voices.
Now, "Windows Speech Recognition" is ready to use.
2. Input using Speech Recognition
To actually perform transcription using this feature, you will use an editor for text input (such as Notepad or Word).
Here, we will launch Notepad as an example.
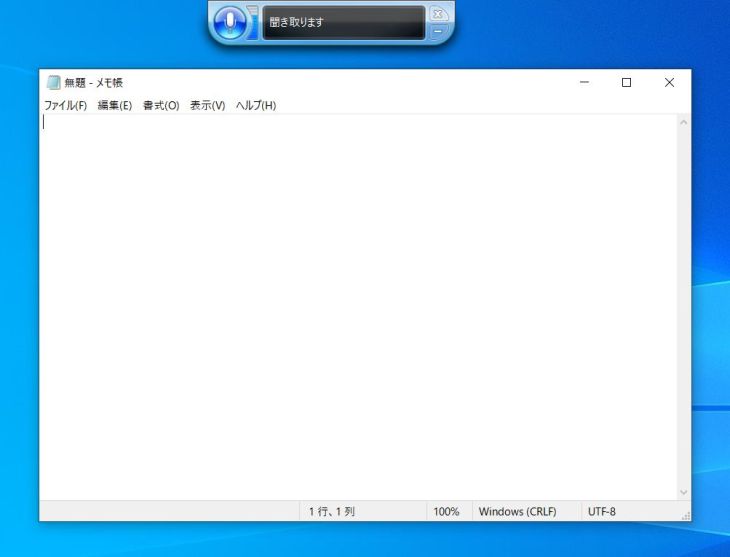
Launch "Windows Speech Recognition" while Notepad is displayed.
In this state, if you speak into the microphone, what you say will be transcribed.
For example, when I said "Hello", it was recognized like this:
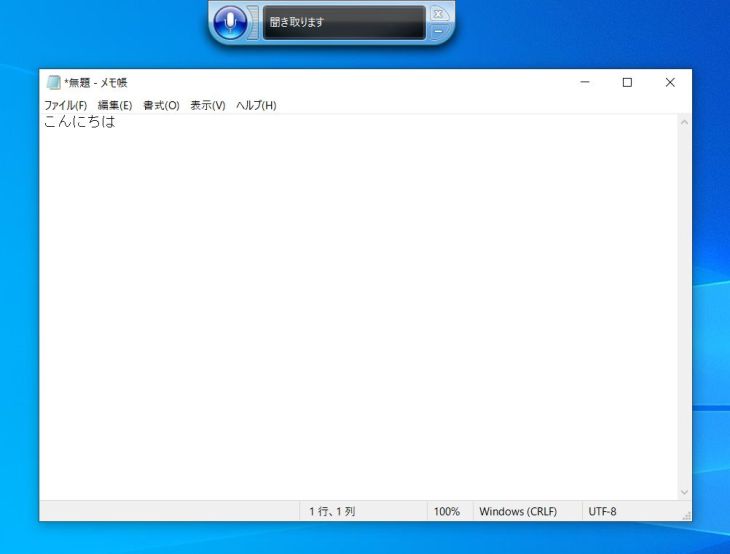
Finally, in Notepad or Word
and save the file as you normally would with other software.
This completes the process of transcribing audio using Windows' built-in features.
Transcribing Recorded Audio Requires Special Settings
Windows' standard speech recognition is primarily designed for real-time transcription, so it's not ideal for transcribing pre-recorded audio data.
If you want to transcribe recorded audio data, you'll need a special setting to "allow Windows Speech Recognition to recognize audio playing on your computer."
Specifically:
Settings: Sound → Recording → Right-click "Stereo Mix" → Set as Default Device: ON
Setting this will allow "Windows Speech Recognition" to recognize (listen to) pre-recorded audio data.
However, this setting is for advanced users familiar with computers.
For an easier way to transcribe audio files, we recommend using an AI transcription service like 'Mojiokoshi-san'.
Transcription Using Mac's Built-in Features

1. Turn on Dictation
To transcribe using Mac's built-in features, first, turn on Dictation.
Open "System Preferences", then go to "Keyboard" and set "Dictation" as follows:
- Dictation: On
- Use Enhanced Dictation: On
- Language: Add Language (US/UK) *1
- Shortcut: Set a hotkey (default is Fn key twice)
*1 We recommend adding English as well, as it can be difficult to type alphabets with only Japanese.
2. Input Using Speech Recognition
Press the set shortcut key (Fn key twice in the example above) and a microphone icon will appear.
With the microphone active, open an app like "Notes" and speak to input audio.
Transcribing Recorded Audio Requires 'Virtual Sound Device'
However, this setting, like Windows' speech recognition, is for real-time audio recognition.
If you want to transcribe recorded audio files, you will need a software called "Virtual Sound Device".
Even on Mac, transcribing with only built-in features is for advanced users.
For more convenient audio transcription, we recommend using an AI transcription service like 'Mojiokoshi-san'.
Transcription Using Google Docs
Google Docs' speech recognition feature can also transcribe real-time audio data.
1. Turn on Voice Typing
With Google Docs open, select "Voice typing" from the "Tools" menu.
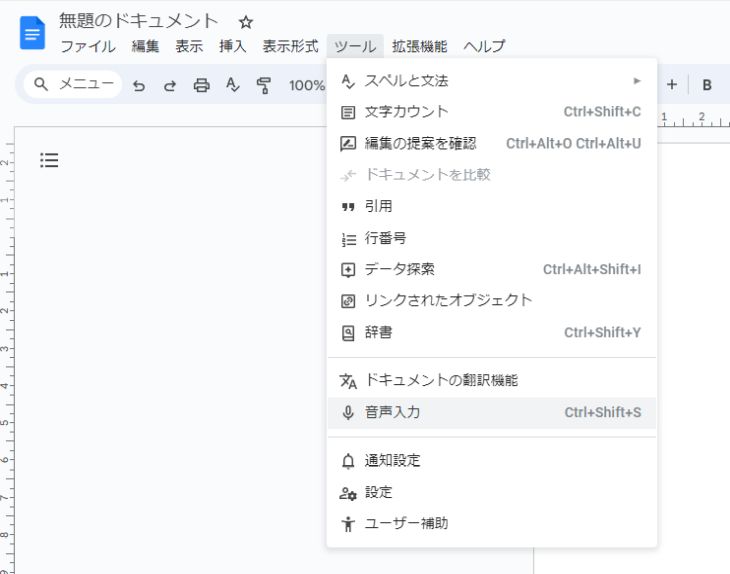
A microphone icon will appear.
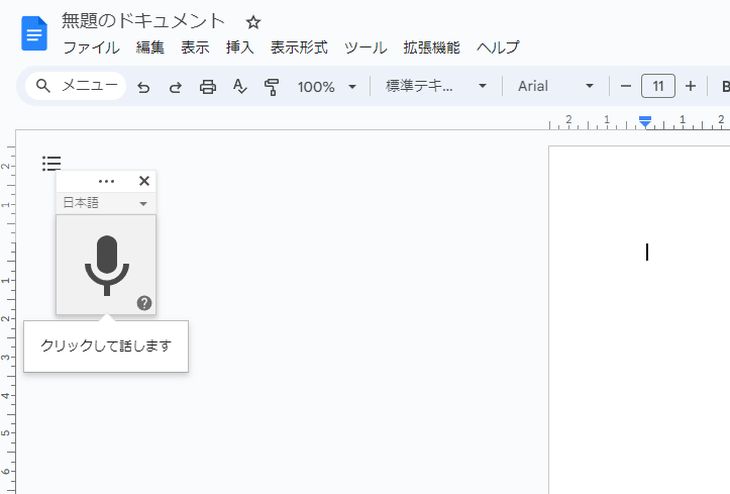
2. Input Using Speech Recognition
Clicking it will turn the microphone red, indicating it's ready to recognize audio.
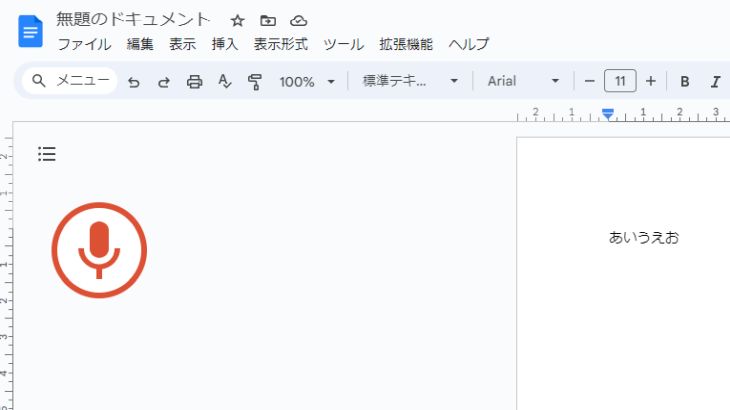
When you speak into the microphone in this state, it will recognize your voice and input text.
Click the microphone again to end voice typing.
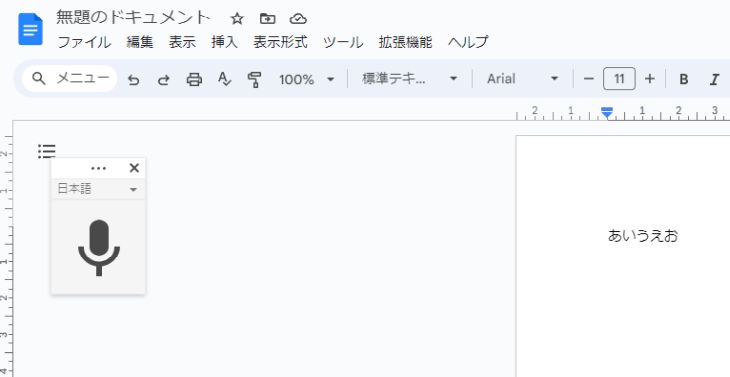
However, this is also a feature for real-time input, just like on Windows and Mac.
Therefore, transcribing pre-recorded audio data requires the same ingenuity as transcribing with standard Windows/Mac features.
If you find the setup troublesome, we recommend considering using an AI transcription service like "Mojiokoshi-san".
Want to conveniently transcribe audio files with an AI transcription service?
Transcribing recorded audio file data can be done in various ways.
Among them, the easiest is to use an AI transcription service.
With an AI transcription service, you can transcribe audio data much more conveniently than with the standard features of Windows, Mac, iPhone, or Android.
If you're unsure about how to transcribe recorded audio, why not try an AI transcription service like "Mojiokoshi-san," which you can use for free?
■ AI transcription service "Mr. Transscription"
"Mr. Transcription" is an online transcription tool that can be used from zero initial cost and 1,000 yen per month (* free version available).
- Supports more than 20 file formats such as audio, video, and images
- Can be used from both PC and smartphone
- Supports technical terms such as medical care, IT, and long-term care
- Supports creation of subtitle files and speaker separation
- Supports transcription in approximately 100 languages including English, Chinese, Japanese, Korean, German, French, Italian, etc.
To use it, just upload the audio file from the site. Transcription text is available in seconds to tens of minutes.
You can use it for free if you transcribe it for up to 10 minutes, so please try it once.
Email: mojiokoshi3.com@gmail.com
Transcription for audio / video / image transcription. It is a transcription service that anyone can use for free without installation.
- What is Mr. Transcription?
- Transcript images, sounds, and videos with Mr. Transcription
- Free registration
- Rate plan
- manual


